|
|
gel type
|
 |
|
Create a new file and some text to go along with
it. For your viewing pleasure during this tutorial, we will use a
blue representation of hexidecimal #336699, R: 51 G: 102 B: 153..
|
 |
|
Control + Click on your type layer to load the
selection. Create a new layer and on the new layer, access Select
> Modify > Contract > 6 pixels. Layer > Rasterize >
Layer comes next.
|
 |
|
Select white as the foreground color and fill
your selection. Control + D to deselect. Filter > Blur >
Gaussian Blur > 8 Pixels, repeat using 4 pixels and finally,
repeat once more using 2 pixels. Lower the opacity of the layer to
50%, click on the layer menu and change the blending mode to Color
Dodge. Make sure you unclick the "R" (red) option. Finally, Control
+ Click on the layer to load the selection.
|
 |
|
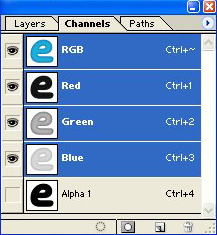
Switch to Channels mode. Click on the Save As
Selection button and then click on the Alpha 1 channel that has
been created.
|
 |
|
Repeat the earlier Filter > Blur > Gaussian
Blur settings, first at 8, then 4 and finally, at 2. Return to the
Layers palette, create a new layer and move it to the top of the
palette. Select the new layer and fill it with black.
|
 |
|
And now the real fun begins---go to Filter >
Render > Lighting Effects and use the following settings: Gloss:
75, Material: -36, Exposure: 56, Ambience: -100. Make sure the
Texture Channel is set to Alpha 1 and click okay. Create a
directional light, setting of 32. For the finishing touch to this
step, Filter > Blur > Gaussian Blur > 3 pixels.
|
 |
|
Image > Adjust > Curves is next. The
settings above work well.
|
 |
|
After the curves are properly applied.
|
 |
|
Use a drop shadow at the default settings, with
the blend mode set to Multiply. Then, Inner Shadow with these
settings: angle of 80, color of white and using the Quality Contour
of "Cone."
|
 |
|
A final Gaussian Blur using a setting of 2.0 and
you're done.
|
|
| 


