|
|
red chrome emblem (pony car)
|
 |
|
Open a new document and set the foreground color
to 400045 or 660000. Select the Linear Gradient Tool and draw a line
from the top left to the bottom right of the image. Create a new
layer.
|
 |
|
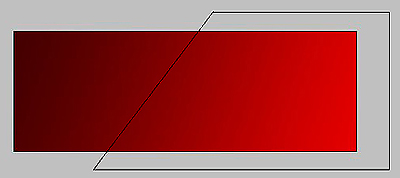
In the Optional-But-Looks-Cool department,
utilize the Polygonal Lasso Tool and draw a rectangular selection as
shown. It is easier to increase the size of the document window to
draw the selection properly as you'll be drawing outside the initial
boundaries of the image.
|
 |
|
With the new layer active, utilize the Linear
Gradient Tool once again and draw a selection from the middle left
of the new layer downwards and to the right.
|
 |
|
Create and position your text; in this case, we
are going to use our favorite pony car. Experiment! Go to the Layers
Palette and utilize the following settings.
|
 |
|
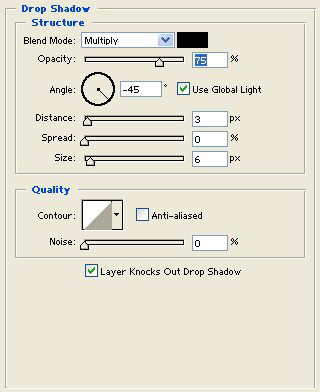
Drop Shadow: Blend Mode > Multiply, Angle >
-45, Distance > 3, Size > 6.
|
 |
|
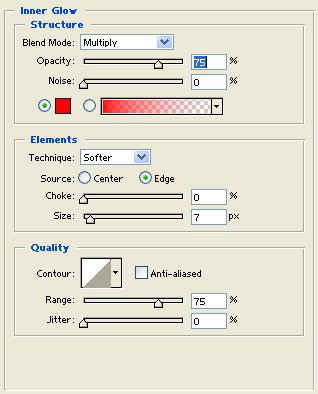
Inner Glow: Blend Mode > Multiply, Color >
#990000, Opacity > 75%.
|
 |
|
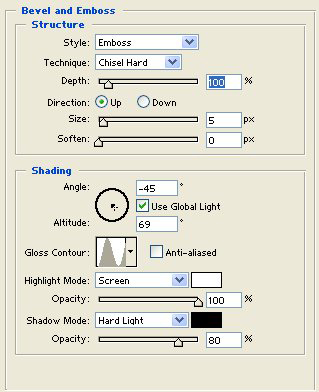
Bevel & Emboss: Style > Emboss, Technique
> Chisel Hard, Gloss Contour > Ring.
|
 |
|
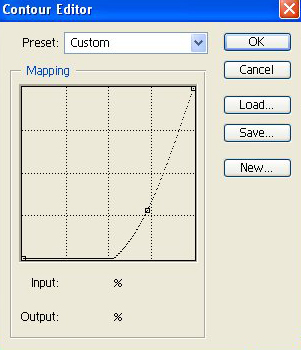
We are getting close to creating the emblem look.
Now to make a simple change using curves. Under Bevel & Emboss,
double-click on Contour to bring up the options menu and double
click on the Coutour window. The Mapping Editor window will appear.
|
 |
|
Click on the diagonal line to make a point and
drag it down to the area shown. You can experiment by creating
various points to create a myriad of final results.
|
 |
|
There you have it...all the exterior and interior
type curves fit quite nicely.
|
|
|


